- Joined
- Dec 14, 2024
- Messages
- 28
How to replace a malfunctioning Turn Signal Switch on a 1994 through 2001 General Motors W-Body vehicle
Generation 1 W-Bodies:
Pontiac
1994-1996 Grand Prix
Buick
1994-1996 Regal
Oldsmobile
1994-1997 Cutlass Supreme
Generation 1.5 W-Bodies:
Chevrolet
1995-1999 Monte Carlo
1995-2001 Lumina
Before we begin, here are a couple of questions to ponder:
-- Will your Center High-Mount Stop Light (CHMSL) illuminate when you depress the brake pedal, but the lower/outer lights will not?
-- Do you have to hold the signal lever in a certain spot to get the turn signals to flash?
-- Do you have to hold the signal lever in a certain spot to get the lower/outer brake lights to illuminate?
-- Will the signals work in one direction, but not the other?
If you answered yes to any of the preceeding questions, your turn signal switch is likely malfunctioning.
**One more question before we continue: Is the turn signal lever not "cancelling" (returning to the "off" position) after you make a turn? If this is the case, you have a broken "cancelling spring." Please see the accompanying section at the bottom of the page for replacement instructions.
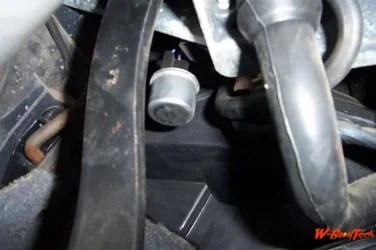
Before you begin disassembly of your steering column, verify the turn signal flasher is not malfunctioning. If your brake lights work fine, but not the signals (either direction,) then it's likely the flasher is burnt out. The flasher itself is located underneath the dash near where the steering column passes through the firewall:

Throughout this post you'll see me refer to the steering wheel radio controls as "RSWC." That's GM-Speak for "Redundant Steering Wheel Controls."
Okay, are you ready to sweat a little? This task is not for the mechanically inept, so back out now if you aren't sure you're up to the task.
Tools required for disassembly and removal:
- Standard socket set (3/8" drive)
- #30 TORX bit (not absolutely necessary, a hex-head will work if you don't have a TORX set)
- Steering wheel puller:

Snap ring pliers:

Lockplate compressor:

2 small flat blade screwdrivers:

But before we begin, you do need to purchase a new signal switch, correct?
Here are the part numbers from GMPartsDirect.com .
With Steering Wheel Controls (RSWC) 19005032
Without Steering Wheel Controls (RSWC) 19005031
Also, RockAuto.com sells Genuine AC Delco signal switches.
With Steering Wheel Controls (RSWC) D6214A
Without Steering Wheel Controls (RSWC) D6226A
They also sell non-GM branded signal switches.
O'Reilly Auto Parts sells BWD brand signal switches.
Here are some pics of my new signal switch that I ordered it from CarParts.com in 2006. (CarParts.com has subsequently been gobbled up by JC Whitney, so I recommend Rock Auto)

Notice the box carries both the AC Delco part #, and the GM part #.
Here's a pic of the new switch:

Allright, still with me? Let's begin.
1. Park the car with the steering wheel centered and the wheels straight ahead.
2. Locate and remove the "Airbag" or "SRS" fuse in the passenger side fusebox. There is more than one fuse for the airbag system, so I like to start the car after step 2 to verify the Airbag light in the dash remains lit. This way you know for sure that you pulled the correct fuse. On the Regal, it's fuse #21, highlighted below:

3. Remove the Negative battery cable.
4. Remove the trim panels underneath the driver's side of the dashboard.
5. Locate the yellow "CPA" connector for the airbag underneath the dash to the right of the steering column and disconnect. Remove the blue (or green) pin from the center of the connector to allow for the tab to be depressed.

6. Use the #30 TORX bit (or the corresponding Hex bit) to loosen the 2 bolts that secure the airbag to the steering wheel, located on the back of the wheel. The bolts will stay inside of the wheel. You will have to turn the wheel to the left to get to the left hand bolt.
7. Lift the airbag module away from the steering wheel.
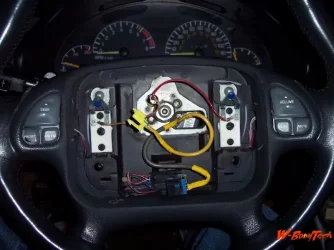
8. Using the same procedure as described in step 5, disconnect the airbag wiring. Also disconnect the horn wire and RSWC connector (if available.) The horn is disconnected by following the red wire down to the white plastic "cylinder" sticking up from the column. Press in on the cylinder and rotate it counter-clockwise, then it should pop out (it's spring loaded.) On the Regal, there is a ground wire that "pins" inside of one one of the bolt holes for the steering wheel puller. Be sure to remove it as well. The Grand Prix and Lumina airbags will have a large piece of metal that acts as a spring that rests against the steering shaft (that is how the horn gets "grounded.")
9. Set the airbag aside. Carry it with the driver's side facing away from you. Set it down on a workbench facing up.
10. Point the wheels straight ahead once again.
(Continued in the next post)
This pertains to the following vehicles:Generation 1 W-Bodies:
Pontiac
1994-1996 Grand Prix
Buick
1994-1996 Regal
Oldsmobile
1994-1997 Cutlass Supreme
Generation 1.5 W-Bodies:
Chevrolet
1995-1999 Monte Carlo
1995-2001 Lumina
Before we begin, here are a couple of questions to ponder:
-- Will your Center High-Mount Stop Light (CHMSL) illuminate when you depress the brake pedal, but the lower/outer lights will not?
-- Do you have to hold the signal lever in a certain spot to get the turn signals to flash?
-- Do you have to hold the signal lever in a certain spot to get the lower/outer brake lights to illuminate?
-- Will the signals work in one direction, but not the other?
If you answered yes to any of the preceeding questions, your turn signal switch is likely malfunctioning.
**One more question before we continue: Is the turn signal lever not "cancelling" (returning to the "off" position) after you make a turn? If this is the case, you have a broken "cancelling spring." Please see the accompanying section at the bottom of the page for replacement instructions.
Before you begin disassembly of your steering column, verify the turn signal flasher is not malfunctioning. If your brake lights work fine, but not the signals (either direction,) then it's likely the flasher is burnt out. The flasher itself is located underneath the dash near where the steering column passes through the firewall:
Throughout this post you'll see me refer to the steering wheel radio controls as "RSWC." That's GM-Speak for "Redundant Steering Wheel Controls."
Okay, are you ready to sweat a little? This task is not for the mechanically inept, so back out now if you aren't sure you're up to the task.
Tools required for disassembly and removal:
- Standard socket set (3/8" drive)
- #30 TORX bit (not absolutely necessary, a hex-head will work if you don't have a TORX set)
- Steering wheel puller:
Snap ring pliers:
Lockplate compressor:
2 small flat blade screwdrivers:
But before we begin, you do need to purchase a new signal switch, correct?
Here are the part numbers from GMPartsDirect.com .
With Steering Wheel Controls (RSWC) 19005032
Without Steering Wheel Controls (RSWC) 19005031
Also, RockAuto.com sells Genuine AC Delco signal switches.
With Steering Wheel Controls (RSWC) D6214A
Without Steering Wheel Controls (RSWC) D6226A
They also sell non-GM branded signal switches.
O'Reilly Auto Parts sells BWD brand signal switches.
Here are some pics of my new signal switch that I ordered it from CarParts.com in 2006. (CarParts.com has subsequently been gobbled up by JC Whitney, so I recommend Rock Auto)
Notice the box carries both the AC Delco part #, and the GM part #.
Here's a pic of the new switch:
Allright, still with me? Let's begin.
1. Park the car with the steering wheel centered and the wheels straight ahead.
2. Locate and remove the "Airbag" or "SRS" fuse in the passenger side fusebox. There is more than one fuse for the airbag system, so I like to start the car after step 2 to verify the Airbag light in the dash remains lit. This way you know for sure that you pulled the correct fuse. On the Regal, it's fuse #21, highlighted below:
3. Remove the Negative battery cable.
4. Remove the trim panels underneath the driver's side of the dashboard.
5. Locate the yellow "CPA" connector for the airbag underneath the dash to the right of the steering column and disconnect. Remove the blue (or green) pin from the center of the connector to allow for the tab to be depressed.
6. Use the #30 TORX bit (or the corresponding Hex bit) to loosen the 2 bolts that secure the airbag to the steering wheel, located on the back of the wheel. The bolts will stay inside of the wheel. You will have to turn the wheel to the left to get to the left hand bolt.
7. Lift the airbag module away from the steering wheel.
8. Using the same procedure as described in step 5, disconnect the airbag wiring. Also disconnect the horn wire and RSWC connector (if available.) The horn is disconnected by following the red wire down to the white plastic "cylinder" sticking up from the column. Press in on the cylinder and rotate it counter-clockwise, then it should pop out (it's spring loaded.) On the Regal, there is a ground wire that "pins" inside of one one of the bolt holes for the steering wheel puller. Be sure to remove it as well. The Grand Prix and Lumina airbags will have a large piece of metal that acts as a spring that rests against the steering shaft (that is how the horn gets "grounded.")
9. Set the airbag aside. Carry it with the driver's side facing away from you. Set it down on a workbench facing up.
10. Point the wheels straight ahead once again.
(Continued in the next post)
Attachments